Gemmy Skull MIDI Hack
Oct 28th, 2008 by Scott
Gemmy Animated Scary Skulls are great for hacking. Their jaws move, their eyes light up (and even move on some models), and best of all they’re cheap.
Right out of the box they’re not so impressive though. You trip the motion sensor and garbled noise comes out of the tiny speaker for a few seconds.
What’s it saying? It sounds kind of like “I’m on sale” to me. I guess they just want you to subconsciously decode the message and buy more skulls.
The best thing to do with these skulls is to rip their brains out and add MIDI control so you can sync them with your own soundtrack. This tutorial will show you how to do just that.
What You Need
- 1 Gemmy Animated Scary Skull
- 1 MIDI to active-high logic-level board (I used Midify but others would work too)
- 1 Small perfboard
- 1 TIP120 NPN Darlington Transistor
- 1 2N2222 NPN Transistor
- 2 1k resistors
- 2 4.7k resistors
- 1 47 ohm resistor (link goes to ½-watt but ¼-watt is fine)
- 1 1N4004 Diode
- 1 10uf Electrolytic Capacitor (link is to non-polarized but doesn’t have to be)
- Wire
- Wire cutters
- Wire stripper
- Soldering stuff
- Phillips Screwdriver
- Hot-glue gun
Update: If you’d rather buy a MIDI circuit with all the transistors, etc. already assembled there’s a Midify Your Skull board now.
Update to the update: If you’d rather not do any soldering at all and just want to have a singing skull you can get ready-to-go MIDI-controlled skulls.
Build the MIDI Control Circuit
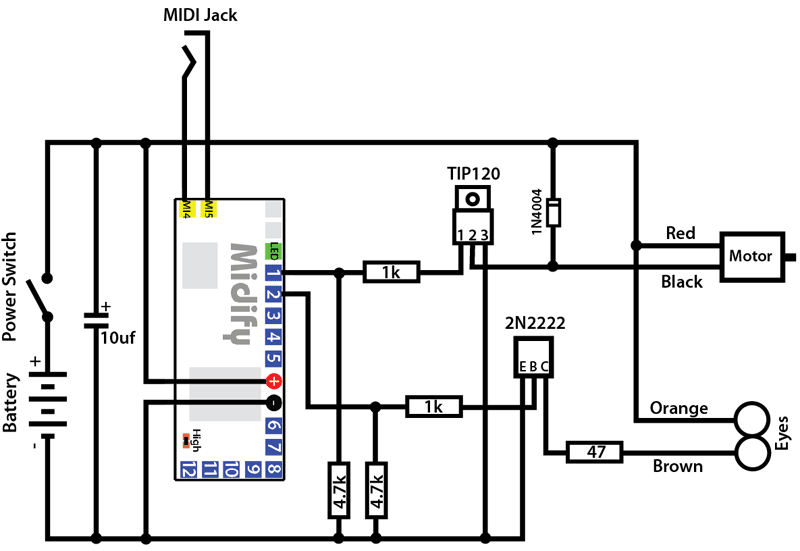
The circuit is based around the Division 6 Midify board, which basically looks for MIDI note on/off commands and turns on/off the corresponding outputs. Since the Midify board can’t supply much current we need to add some transistors to do the heavy lifting.
Note: there are several other MIDI boards out there that will work too, but this one is very small and easy to fit inside the skull.
Another note: The Midify board has 12 outputs, so you could run up to 6 skulls from one board (or 12 if you only use the mouth, for instance).
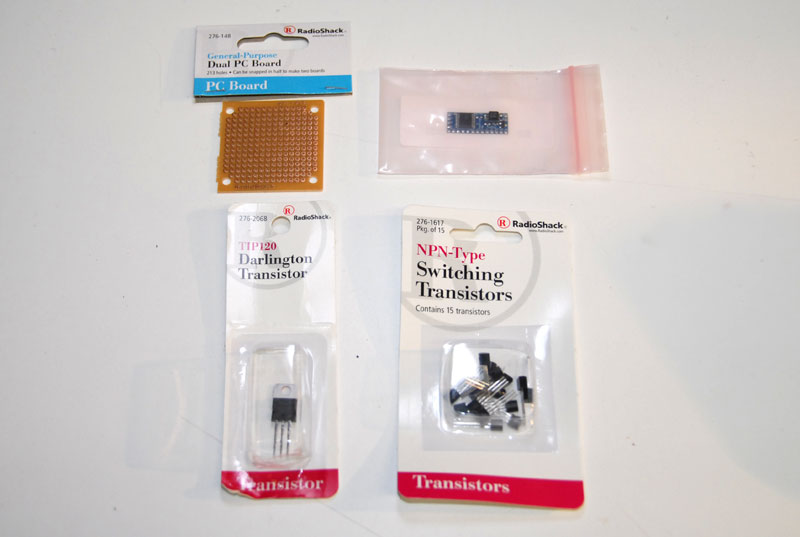
Here is what you need to build:
You only need ½ of the perfboard, so snap it in half and save the other part for something else.
Start by hot-gluing the Midify board to the edge of the perfboard.
Next, use a blob of solder to short the two pads on the board marked “high”. This will put Midify in active-high mode, meaning that when an output is “on” it will be high and when it is “off” it will be hi-z.
Stuff all your parts so you know that your layout works and that you have room for everything.
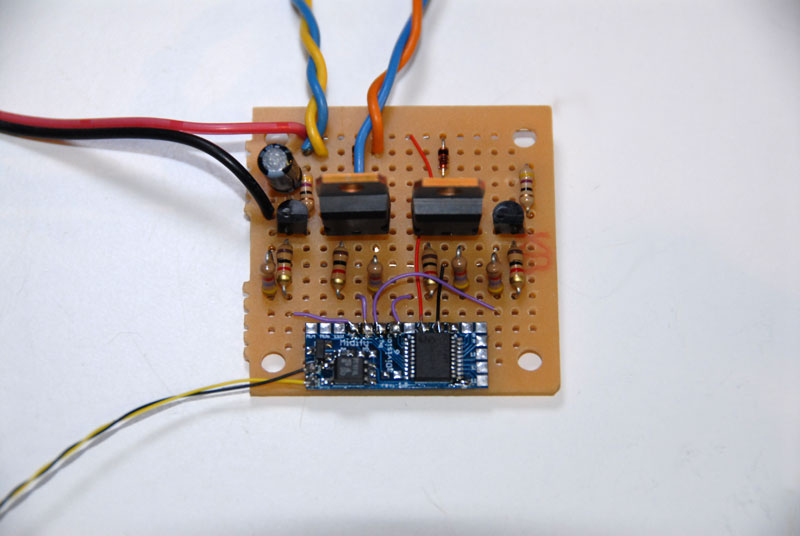
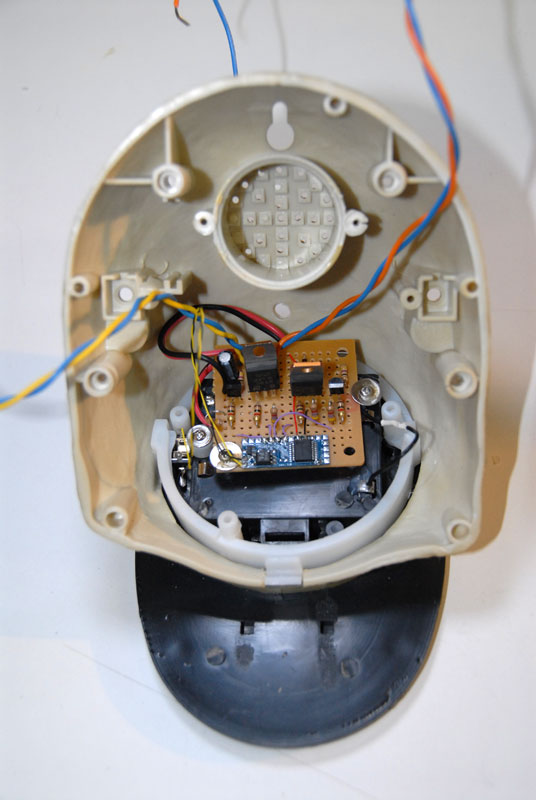
Start soldering. You may want to attach wire “pigtails” for power and the motor and LED outputs so that it’s easier to connect later. Here’s what my finished board looked like:
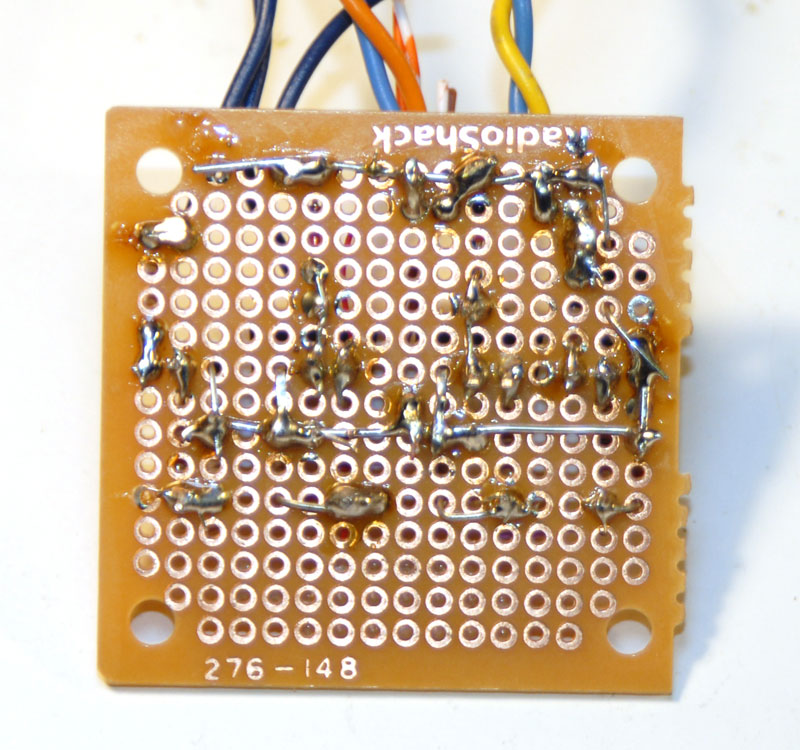
More Update: I’ve had several requests to see the back of the board. It’s kind of a mess but I’m going to post it anyway and I’m doing it just for you. Here it is, by popular demand, the backside of the board:
Note: I’m running two skulls from my board so it has twice as many parts as you need for just one. If you want to run multiple skulls it’s easy to add transistor circuits to the Midify outputs. The 2N2222 circuit with the 47-ohm current limiting resistor is for the eyes and the TIP120 circuit with the snubber diode is for the mouth.
Braaaaaaains!
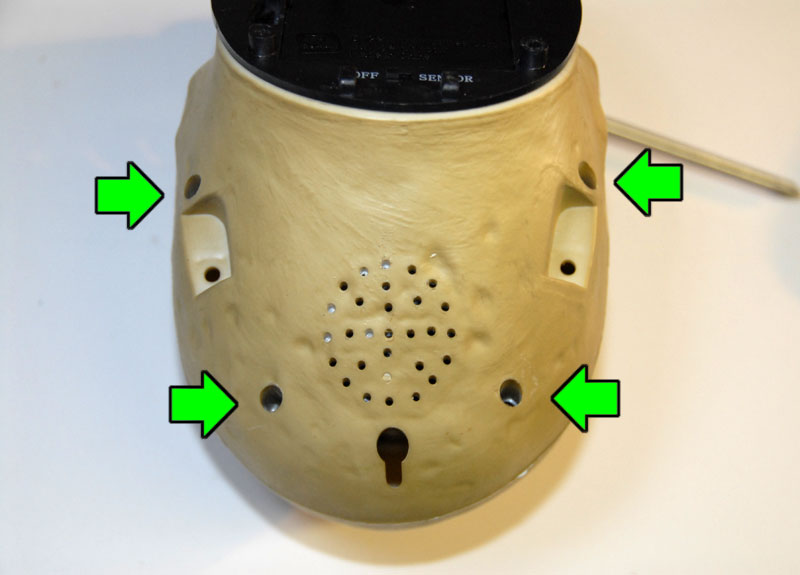
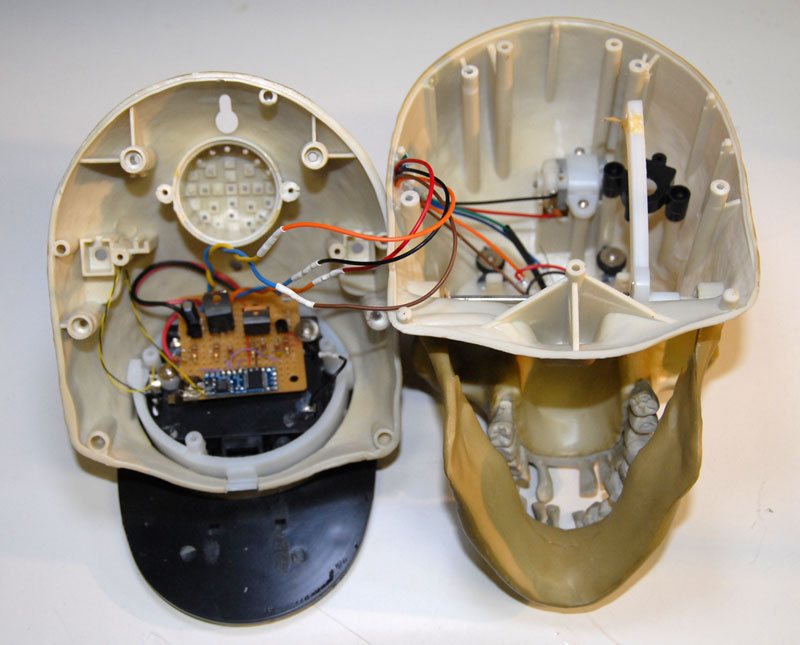
Now that the circuit is ready to be installed it’s time to disassemble the skull. There are four screws on the back that need to be removed.
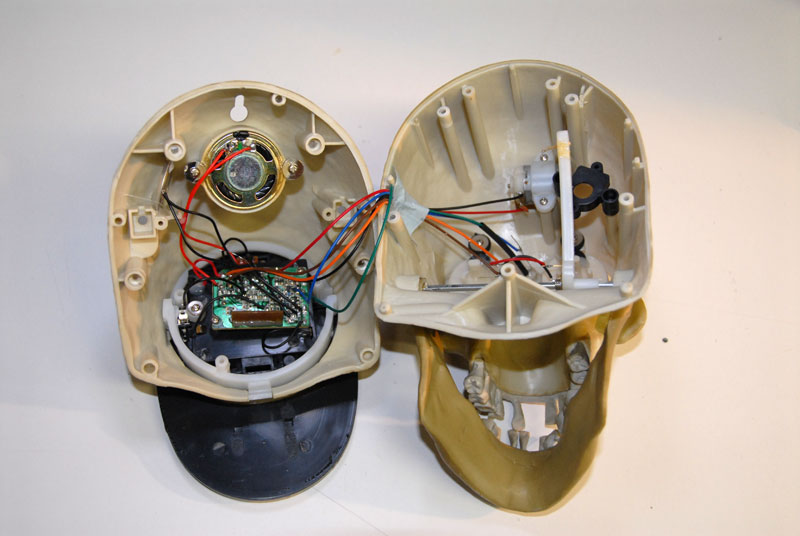
Pull the two halves of the skull apart.
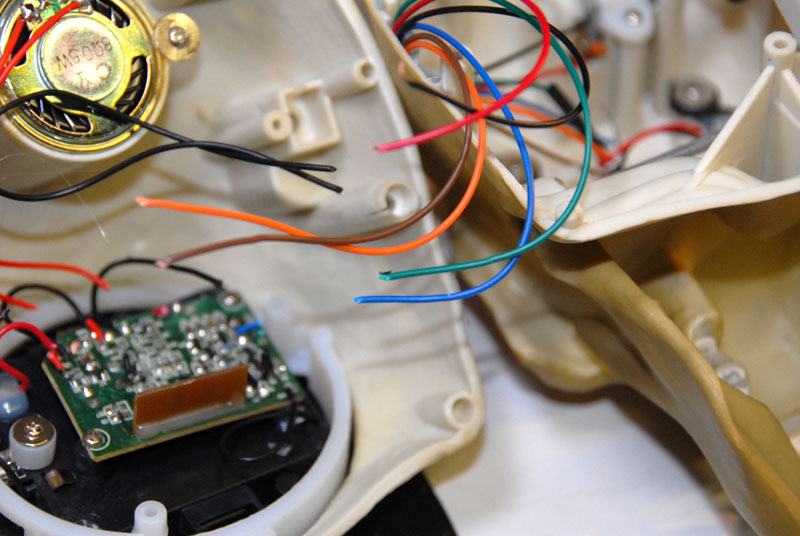
Clip all the wires going to the circuit board. Clip them close to the board so you have some wire to work with when you hook up other stuff later.
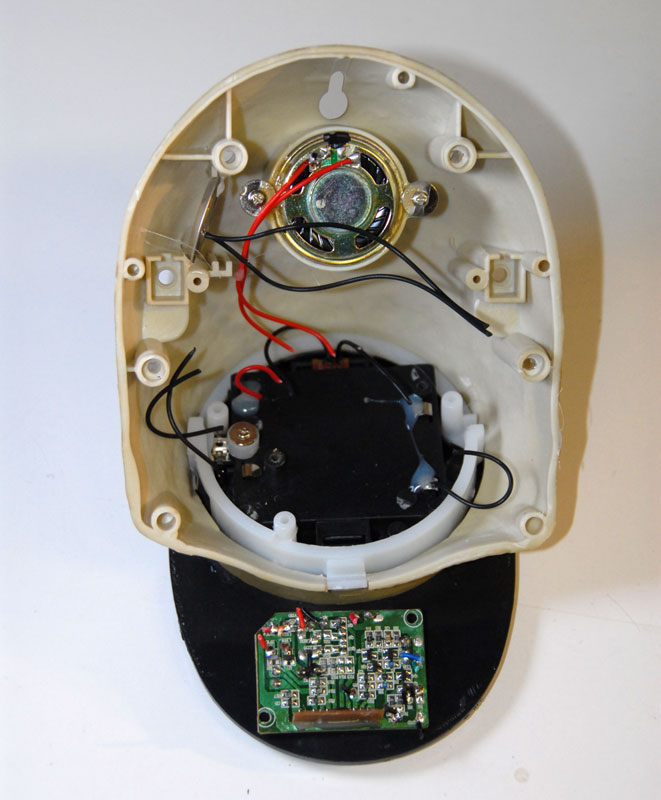
Remove the circuit board.
Remove the speaker, transducer, and whatever else you don’t plan on using. Add them to your “free parts” bin.
The Transplant
At this point you have a few choices to make. First, where to get power. You can continue to use the built-in batteries, or you can power everything with an external 5 volt power supply. Another choice is whether or not to use the original power switch. Finally, it just so happens that the 2.5mm mono “Try Me” button jack on the bottom of the skull is the same as the one that comes with the Midify board, meaning you can either drill a new hole and mount that one or just hook up the stock jack in the bottom. From here on out I’ll assume you decided to use built-in everything.
Connect the batteries and power switch, all in series.
Connect MI4 and MI5 on the Midify board to the 2.5mm jack. Make sure MI4 goes to the tip of the connector.
Use the washer-head screws you removed earlier to attach your new circuit board to the bottom of the skull.
Solder the Motor and LED outputs of the board to the mouth and eyes of the skull. The wire colors are on the schematic to make it easier. Use tape or heat-shrink tubing to insulate the conections.
Testing
Reassemble the skull, making sure that none of the wires you added (or any of the loose ones) will interfere with the mechanics of the mouth.
Use the MIDI cable that came with the Midify board to connect the skull to a MIDI keyboard. Note: if you are using the jack in the bottom of the skull you may want to chop the 2.5mm plug off of the MIDI cable and attach the right-angle one from the “Try Me” button. Just make sure you get the polarity right.
Turn on the skull. Look for no smoke.
Press middle C on the keyboard. The mouth should open.
Press C# above middle C. The eyes should light up. (I hooked mine up different I guess, because these are backwards in the video. It doesn’t really matter what output you map to what.)
The default mode of the Midify board is mono, so you probably can’t run the eyes and the mouth at the same time. Here are instructions for changing it to poly mode.
Using Your New Skull
Now that you have a MIDI-controlled talking skull it’s up to you how you use it.
For this demo I connected the skull to my PC, which is running Sonar. First I made an audio track with the music. Then I recorded a MIDI track, using a keyboard to trigger the mouth movements to the music. Then I recorded another MIDI track for the eyes. If I messed up the timing it was pretty easy to go in and edit it in the software.
That’s it. Go forth and build your loyal skull army!
Update: Here are a couple talking skulls singing with some friends:


This rocks…MIDI is the wav of the FUTURE!!!
Great job!
Thanks so much for all this information.
This was very well detailed and I appreciate the time you took doing this.
I plan on doing the skull project with alien head skin over it to finish my alien band project. You can see some pix of this on my website under `Future Projects’.
Thanks again, I salute you for your cleverness and creativity!
Jerry `Wildness’ Wilson
Scott, any idea what’s going on with the MIDIfy board? All of the pages except the FAQ for it are all down over at Division6. I was thinking about picking some up soon to wire up some skulls.
Terrormaster: They are supposed to be back in stock around the end of the month. Don’t worry, you’ll be able to make plenty of skulls by Halloween!
This is amazing and really want to give it a try, but have questions. Do you have any photos of the underside of your circuit, just trying to make sure I’m follow you schematic correctly. I have other questions but won’t flood them all out. Thanks for the tutorial.
Do you have a link to an online dealer for the Gemmy skull? This tutorial is great thanks for putting it together!
This is great! The music on the video for the pumpkins, what is the name of it and where can i get it?
I love what you have done. I think I’d like to try this with a Snowman,elf or Santa for Christmas. Thank you for posting this.
@Derek: They’re kind of hard to find right now. You can try here:
http://www.division-6.com/store/gemmy-animated-talking-skull-c-33-p-1-pr-52.html
@Darlene Thanks! The music is “Grim Grinning Ghosts” and it’s from Disney’s Haunted Mansion. You can buy it on some Disney CDs or probably just find it on the Intertubes.
Scott, I have wanted to do this for the last 2 years!
I would like to see the underside of your board, ( I am a novice and have not done anything like this before, would just like to get it right). also, the board said you can hook up 6 skulls, I would like to see some detail on this, also what software and how do you program them (detailed). wanted to do this for a long long time! I am the only one that decorates for halloween in my neighbor hood, this would be a spooktacular event! lol
@Robert(& Chris: Sorry): I’ll see if I can get a picture of the bottom of the board (it’s not pretty so no making fun). The Midify board has 12 different outputs so you could use it to control the eyes and mouths of 6 different skulls. I only included enough support circuitry in the schematic for one skull (the board I actually built would run two) but it’s pretty easy just to add more transistors/resistors/diodes and fill up all 12 outputs.
I used Sonar to do the sequencing, but any software that will do MIDI/audio sequencing would work. It sounds like I need to write an article just on that part of it. I’ll try to get one up soon.
I’m pretty sure your neighbors would be jealous if you had singing skulls! =p
Scott, got my parts! yea! got a neighbor that can show me how to soider everything.
Now back to the daisy chain. I had planned to just build a board for each skull. … Could I create a “midi box” that has 6 outputs, then run those to each skull as needed with plugs? could you sketch something up like that or if I build a board that can run all 6 then run connections to each skull…could you sketch that too?
oh yea, powering all of this without burning things up…how to?
does each board get hooked up to a battery? and if I have the box that can run all 6, how much power and how? LOL
I have so many questions…is there anyway I can get you my email address without posting here? sorry if my questions seem a little nave…like I said this is my first real cool thing to add to the yard and I want to do it right…I am the only one for blocks that does anything…oh and “damn it Scott Im an artist not an electrican!” lol as bones would say.
Robert-
Shoot me an email via the “Contact Us” link at the top of the page and I’ll do what I can to help you out.
i would like to make a six skull display ,, can u tell me how to do it i never done enything like this
Where can I buy these skulls this time of year? Thanks.
@Lee: Old comment I know (sorry), but this should help give you an idea: http://www.division-6.com/learn/multiple-midi-controlled-skulls.php
@Brian: I don’t know. They’re hard enough to find around Halloween it seems. If you do find a source please post it here though! (There used to be a couple online shops that sold them year round but they ran out and didn’t get any more in)
Sorry, I know it’s an old thread, but for future reference:
If you’re in the States you can find the Gemmy Scary Skull out of season here…
http://www.americansale.com/Products/Halloween-Animation–Scary-Skull-with-Sound-by-Gemmy__331814.aspx
I just checked, and it seems they still have them. Thanks again for the link!
Is this mifidy board still available? Any reference to it takes you to a synthizer board. No ore info on this circuit to be found
stop smoking
AUTOMAT3D » Blog Archive Gemmy Skull MIDI Hack | AUTOMAT3D